

Face binding is my favorite way of binding modern quilts. It creates a clean and sleek look that does not show on the front of the quilt. As a bonus, it also avoids the tricky final joining of traditional binding. Follow this tutorial if you would like to learn a simple way to create face binding yourself! For this tutorial I'm using a mini quilt made from leftover Half Square Triangles from my Green Lake quilt pattern. I recommend trying this on a mini quilt yourself to practice the technique. If you would like my free Face Binding Quick Reference Guide, download here!
What you will need:
- Trimmed and squared quilt
- Binding fabric amount per pattern (see Step 1)
- Ruler
- Iron + ironing board
- Snips or scissors
- Marking pen or pencil
- Hera marker or similar tool (That Purple Thang)
- Sewing machine
- Hand sewing needle
- Thread
- Thimble
- Binding Clips

Step 1. Measure the left, right, top, and bottom edges of your quilt. Create a binding strip for each edge with a length approximately 1-3" longer than each edge. Piece a long enough strip if needed. My favorite binding width is 2 1/2" because it's enough fabric to easily manipulate and you can use what a pattern calls for. Your width could be much thicker than this if you would like.

Iron each strip in half lengthwise. Set aside the top and bottom binding strips for Step 4.
Note: Don't get confused by the strawberry print- it's just my ironing board cover!

Step 2. Using one of the two side binding strips, align the raw edge of the right side binding strip with the raw edge of the quilt's finished side. The top edge of the binding edge can overhang the top edge of the quilt slightly. Attach with a 1/4" seam.

Trim the top and bottom edges of the binding strips to be even with the top and bottom edges of the quilt. Repeat on the left side of the quilt with the left side binding strip.

Step 3. Iron the side strips away from the quilt.

Then, flip the quilt so that the back is facing up. Fold the strips on top of the quilt so that the seams are at the outermost edge of the quilt, pointing out.

Iron to train the quilt and side binding strips to the accept the placement.
Flip the binding strips back into the previous position (sewing position) for the next step.
Step 4. Using the top binding strip, align the raw edge of the top binding strip with the top raw edge of the quilt's finished side. Before sewing, ensure that the beginning short edge of the top binding strip is placed midway between the 1/4" seam and the folded edge of the side binding.
Sew top binding strip in place with a 1/4" seam starting at the corner of the quilt. This means that you will be sewing on the quilt edge before you reach the beginning edge of the binding strip.

When you are about 3" away from the opposite edge, pause with your needle down and align your strip end to fall between the existing seam of the side binding strip and the side folded edge. Mark a spot midway between the folded edge and the 1/4" sewn side seam of the side binding.

Trim the top binding strip on the mark you just made.

Continue to sew the top binding strip in place all the way to the corner of the quilt. Repeat this process for the bottom strip. Notice that now there is a seam attaching binding strips on all quilt edges.

Step 5. Iron the top and bottom strips away from the quilt.

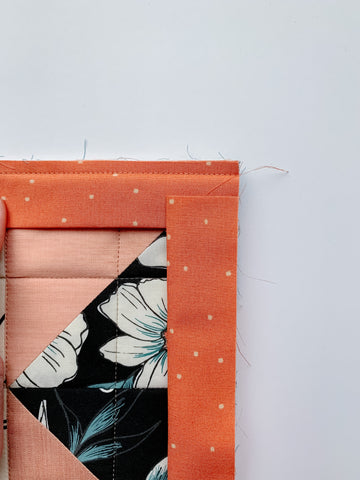
Trim the quilt diagonally close to the seam line.

Flip and turn all the binding corners outward. I like to use the Hera marker's dull point or That Purple Thang to get all corners expanded.

Flip the quilt so that the back is facing up, and fold all strips on top of the quilt so that the seams are at the outermost edges of the quilt and the binding is completely on top of the quilt back. Iron the top and bottom edges and the corners to train the quilt and binding strips to accept the placement. If you are having trouble getting your binding to behave at this point, you can trim the seam allowance so that not as much bulk is getting folded over.

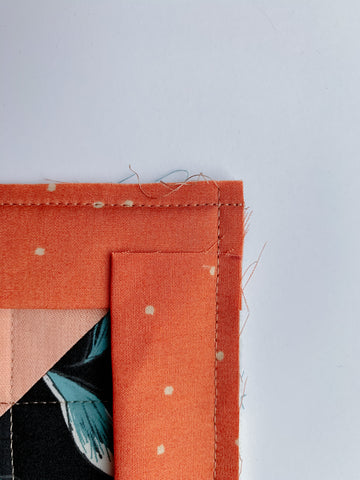
Secure the binding strips down with binding clips.

Blind stitch in place like you would with traditional binding. The corners don't require any mitering, yay!
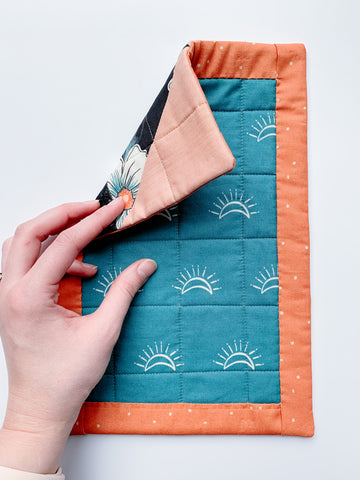
Ta-da!

10 comments
Looks so easy & can’t wait to try this method today! Very clever!
Recently tried this method. This was great especially on the smaller projects. For me, I would make the binding a touch wider as I used two layers of Insulbrite, and it would have been easier for me. But this is perfect for all the smaller projects that don’t need the fuller inside. This is so much better. Thanks for sharing. Will definitely be using this on other projects.
This is one of those “why didn’t I think of this” moments!
No way! I am absolutely going to try this. Thanks for showing me 🙂
I’ve never seen this technique before. I love it! Your directions were super clear. I can’t wait to try this out!